What is semihosting and why it is heartbreaking

If you are developing on Arm platform, you have extensive set of methods to establish link between host and target platform, such as:

  • Serial port
  • USB
  • Bluetooth and bluetooth low energy
  • ITM
  • Semihosting

The last two is the most easiest and convenient one. Because if you connect the debugger to the target system, you already have a device that can communicate, the cable, connector etc for the purpose.. You do not need a USB to TTL device, or complex USB firmware.. Actually with Art library it is not that complex, but that’s another topic.

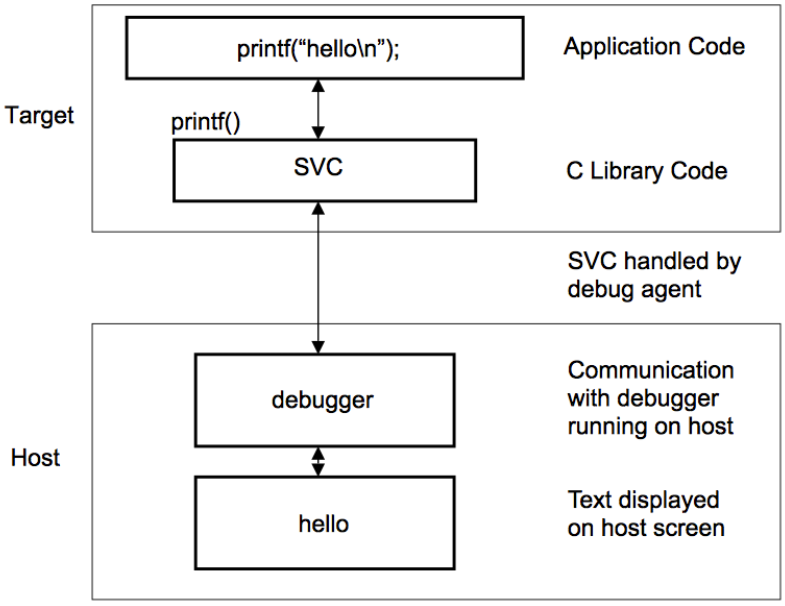
With semihosting, the target platform, MCU can access to host resources via debug agent:
ARM_Semihosting_largeOn the internet, there are clones of the same information on the subject. They tell linking against a library that supports semihosting however, there isn’t much about how the semihosting is implemented.

As far as I understand, semihosting is not implemented much on the targed side, but mostly implemented on the debugger software.. I am not %100 sure about this but looking at the how it works, I only see a “trigger” on target side, the rest is cared out automatically.. For instance the following code debugged on LPCXpresso pushed two lines seen in the “Console” tab at the bottom:

Semihost on LPCThe first line “test 0” written by printf function, the second line with  “write” text is written by _write function.. The debugger carries the texts into the console embedded into the eclipse.. _write is mentioned in the semihosting documentation but not defined explicitly. By walking through the source code of newlib, I extracted the implementation. The simplest form of it (dropping the checks etc is the following:

Semihost Write
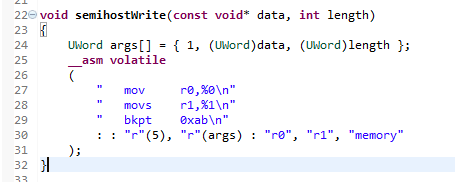
My purpose was to write the semihosting for my Art library that works on multiplatform but this time for STM32F429 series MCU. For those who is not familiar with GCC Assembly, the compiled code is the following:
Semihost Write Compiled
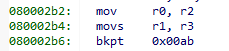
What is does is simple.. It loads r0 with r2 which is loaded with 5 before; r1 with r3, which is loaded with address of the argument table before; and executes breakpoint instruction with code 0x00ab. In manual bkpt instruction is defined as following:

The BKPT instruction causes the processor to enter Debug state. Debug tools can use this to investigate system state when the instruction at a particular address is reached.

imm is ignored by the processor. If required, a debugger can use it to store additional information about the breakpoint.

From this, I deduce that bkpt stops the CPU, informs the debugger. Debugger reads the code given with bkpt instruction, and takes action. In semihosting page of Arm the format is described as following:

BKPT 0xAB

For ARMv6-M and ARMv7-M, Thumb state only.

So, debugger reads the code supplied with bkpt instruction, if it sees 0xAB than it looks at R0. R0 tells the semihosting operation. Those are:

There are more commands, you can follow the Arm’s page.. Here, our semihostWrite function used 0x05, which is SYS_WRITE. R1 points to arrray that holds the arguments used by the command. You can extract the contents of the array in the semihostWrite function. But to name those, there are 3 words (32 bit unsigned integers):

  1. File number: 1
    The file handles are the numbers, and file 1 looks like belonging to debug console.. I think 0x01 SYS_OPEN will open other files stored in the system, and will return numbers other than 1 as handle.
  2. An address to the buffer to read by debugger.
  3. Length of the buffer to read.

The debugger does the rest. Reads the buffer pointed in the second element in the array, with the length in the third element of the array, copies the contents of the buffer to the terminal..

The opportunity to read/write files stored in the host system is interesting. That way you can dump large amount of data into/from the device without other means of protocol, media etc. Commands 0x11 and 0x12 are also unique. With 0x11 SYS_TIME, you can read the system time and date. With 0x12 SYS_SYSTEM (Arm is really bad at naming) you can execute commands on the system..

Semihosting is very nice but has one bad drawback: It takes a precious time to execute and in that time the CPU is stalled.. I run the following code to test the time it requires to transfer a simple string:

Semihost timing
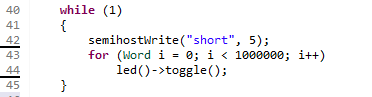
This write requires whopping 140ms with ST-Link Debugger interfaced with OpenOCD. In the following oscilloscope view of the process, in the blue areas the led is toggled, between those areas the debugger is in control, so the cpu is stalled:

Semihost ScopeTransfer of a longer string does not effect much the stalling time. I suspected that the handling is time consuming, not the transfer.. May be the debugger is not event driven, but pooling driven.. Who knows?

I do not know if this is because of ST-Link or OpenOCD but knowing that within this period CPU is stalled is not except-able in many applications. I am sure there will be use cases when the time is not critical, for instance when the system is not doing time sensitive operations. At boot time some data can be read from the host system, or at certain times some data can be pushed to the host however, it would not be a regular, non intrusive debugging alternative.. What an opportunity lost..

I’ll implement the semihosting classes anyway. Because most of the handling is done by the debugger it will be very lightweight and there will be gains. However, I’ll use it sparingly..

The sample Art framework code that reads data from host would be like this:

HostStream stream;
stream.open("~/SampleData.dat");
stream.read(data, sizeof(data));
stream.close();

Reading time and date at the host:

Time time = Time::hostTime();
Date date = Date::hostDate();

For instance, you may set the Rtc date and time by the following code:

rtc()->open();
rtc()->setDateTime(DateTime::hostDateTime());

I wish it were faster..

Adobe Acrobat Reader DC: How an nonintuitive GUI might be

Solution

To hide the annoying, unnecessary, pixel eating right panel in Acrobat Reader DC:

acrobatreadersidebar-to-nosidebar

  1. Close the Acrobat Reader DC
  2. Go to: C:\Program Files (x86)\Adobe\Acrobat Reader DC\Reader\AcroApp\ENU
  3. Create a folder named “Disabled” inside the folder.
  4. Move Viewer.aapp into that folder..

If you are not interested in my rant you can close your browser tab right now.. 🙂

My Rant

I’ve been using Foxit Reader for a long time. It has been “OK” until printing pages started to take infinite.. It has tabbed GUI, however you have to select one between tabbing vs open in new window. If you want to drag a tab out of the stack, it would not allow you to do so.. It only rearranges the tabs.. Weird but I’ll live..

I am really confused why the software developers are really blind to what is obvious.. I see this pattern in every software.. Developers are eager to play with new features but they are really bad at fixing bugs, removing knots, cleaning weeds..

Last week, with the reinstall of Foxit Reader, printing a few pages took infinitely long.. I am not sure the new version or some last versions have this “feature”, because I haven’t been printing PDFs for a long time to feel as if I am not a part of the crime of killing trees..

I suspected of my old Wifi connection. My Wifi settings tells me the connection is at 300Mb however I have been only seeing 1MB/s with LinkSys e900.. It’s funny that my internet connection is much faster than this gimmick access point’less.. I connected my gigabit ethernet and tried reprinting, no, it was not the connection..

I tried Adobe Acrobat Reader DC and its printing speed was acceptable even with my 300Mb on screen, 8Mb at most e900 connection..

In the past Acrobat Reader was too slow. Its name “acrobat” would be like a child’s answer to the question: What will you be when you grow up. Adobe would be acrobat some day.. :))

I don’t know if we started to have SSD’s, gigabytes of memory, fast CPU’s as a standard, but this time Acrobat Reader was not that much slow at all.  As usual, no software gives you what you want without giving you some stupid annoyance. With Acrobat this was the side bar:

acrobatreadersidebarYou may hide side bar by clicking the separator between the document and the bar, however if you open another document it comes back.. There is no option to hide it, kill it, trash it permanently.. Each time user opens a new document, it resurrects and says “hello, not this time”.. User have to click the separator to hide it again. What a waste of precious space and time! This time, space and time is connected though…

I run into this every where, sites with unnecessary stationary banners, annoying big buttons. The most successful waster company could be Google. Try Google App’s or whatever name it has now. You would see top of the screen is eaten by the app to show you the buttons/information you never use.. Do software developers use #@!@#!!234234 number of 27″ 4K monitors? If I were the manager of those companies, I’ll force them using 1280×800 resolution MacBook Pro for a day in a week to make the developers feel why every pixel and any user convenience is important..

Developer! Be respectful to our pixels, clicks, time and patience.

2 Level HAL (Hardware Abstraction Layer) Design

I’ve been working on different brands of MCU for over 20 years and have to reinvent how to use UART, I2C, SPI hardware again and again. 8 years ago I said “enough reinventing” and started to write my own set of libraries that I would port on any MCU I would use..  It evolved from very simple, cooperative tasker, simple drivers to premptive operating system, synchronization primitives to complex drivers. Name and naming conventions also have been changing while the libraries evolve. Nowadays I call it Art. It may even change until I ship it.

When I first started Art, my first aim was to create a simple HAL layer.  On any MCU, developer uses UART, SPI, GPIO, timers most of the time.. If I define what an UART is and write the components that suits the definition, that’s it, I could reuse what I wrote for project A in project B. And that worked really well..

However, that task wasn’t that easy. The different needs for different uses contradict each other.. For instance, serial port uses rx and tx buffer; Modbus uses single buffer to hold received and transmitted as Modbus is unidirectional at a time.. One can use two buffers but that will use unnecessary RAM.

With GPIO pins, you can drive a led, or you can wait for a change on the pin. You can connect many SPI slaves to SPI port, and also that SPI might be slave of other SPI master. The same applies to I2C.

The abstraction of the port should allow those configurations, also there should be a naming convention. With the evolution of the Art, my final design is the following:

  1. Each HAL implementation class has Port suffix: UartPort, SpiPort, I2cPort, PinPort. This is platform specific. Art should supply its implementation as UartPort* uart0(); UartPort* uart1(); SpiPort* spi0(); I2cPort* i2c0(); etc..
  2. Each actual implementation uses the ports as property: Uart port has setUartPort(UartPort*) and UartPort* uartPort(). Similarly SpiMaster, SpiSlave has setSpiPort(SpiPort*) and SpiPort* spiPort() etc.. I2C has similar pattern. This implementation is portable. There is no need to rewrite.
  3. The classes given in 2, are the actual implementations that one should use.

That way, with two level of abstraction, the platform specific implementation becomes very minimal. The HAL component of xxxPort only does very specific job. For instance SpiPort::write(void* buffer, Word length) writes given length of Spi Words to the hardware port. If the length is short enough it uses registers directly. If the data is longer than certain amount it uses DMA. If the hardware has FIFO, it pushes the data into FIFO and if all the data is pushed into the FIFO it does not block the CPU as the hardware may continue the job by itself.. All the management code is moved into SpiMaster.

SpiSlave is a little different story. If you code it blocking, the complation of the execution depens on the behaviour of the master. That will effect all the other codes in the MCU as execution of them will be deferred. To overcome this one can use a dedicated Thread however, that will use resources and also requires synchronization which will add unnecessary complexity to the project.

My approach is using asynchronous writes and reads. That way the you gave the data to SpiSlave and tell it which function to call when the job is done. The thread may handle other jobs at mean time.. Although I talked about asynchronous reads and writes for SpiSlave it shares the same methods with SpiMaster. You can do the same in that class as well but as the control belongs to master and Spi is fast, you usually do not need asynchronicity..

A few sample use case would be the following:

Gpio

Make pin 0 of port A output and clear the pin for STM32F series:

pa0()->configure(PinFunctionOutput0);

Similary, one may hold a pointer to pin and use it:

PinPort* led = pa0();
led->configure(PinFunctionOutput0);
led->toggle();

But there is a better way, with Pin class using PinPort as a port:

Pin led;
led.configure(pa1(), PinFunctionOutput);
led = 1;
led = 0;

This leads to being able to seperate definition and usage:

Pin led(pa1());

int main()
{
  led.configure(PinFunctionOutput0);
  led = 0;
  led = 1;
  led.toggle();
}

Spi

SpiMaster spiMaster;
spiMaster.setPort(ssp0());
spiMaster.setSelectPin(p1_0);
spiMaster.open();

spiMaster.start();
spiMaster.writeRead(dataA, dataB, 8);
spiMaster.stop();

Edge Detection

This code calls handlePinEvent when pin 0 of port 2 of LPC series changes from 0 to 1:

EdgeDetector edgeDetector;
edgeDetector.onEvent().connect(handlePinEvent);
edgeDetector.setPin(p2_0());
edgeDetector.setEdge(EdgeRising);
edgeDetector.start();

The EdgeDetector class is the most easy one to describe why 2 level HAL is beneficial. If all the abstraction is implemented in the PinPort class, we had to put necessary data into it. That means two pointers (one for callback list, one for thread pointer) into every PinPort instance. If one uses 30 pins in a 32 bit environment that means 240 bytes on that platform are wasted just for unused callback pointer and thread pointer. With two level abstraction only those pointers are used in EdgeDetector class..

Thread pointer on the EdgeDetector or similar class is used to denote in which thread the callbacks are run.. With this design, PinPort class uses 0 RAM. Literally.. The tip: The content of it is stored in ROM. p2_0() returns a pointer to ROM..

I use heap on microcontrollers, am I doomed? (1)

I did it again. I went in the different direction from “common sense” and used dynamic memory allocation in my embedded products. Many expert embedded programmers would say “No, you should not”, however if you implemented a correct allocator why not?

The major concerns about dynamic memory in microcontroller is:

  1. The allocation/deallocation time is unpredictable.
  2. Memory fragmentation that leads unusable blocks.
  3. The memory requirement is unpredictable.

Scary? Yes it is.. But, if the given bottlenecks were fixed, dynamic allocation would make developers life a lot easier. Before delving into how to solve those problems, lets have a look at what dynamic allocation offers us:

String class

First of all, a string class that handles the string and being able to write the following would be very nice:

String myDearString = "My Dear String";
String myOtherString = myDearString + " makes my life easier";
if (myOtherString.startsWith(myDearString))
  ..

I’ll write details of my String class in another post. To be fair, I just want to say myDearString is not allocated in heap, because string literals are kept in ROM, String class exploits that by looking at the address of argument, and just keeps a pointer to it.

myOtherString is a sum of two strings (actually two literal strings). The class allocates enough RAM, and combines the chunks, leading “My Dear String makes my life easier”.

Message Queues

In Awin library (a GUI library), many messages are passed to application: Keyboard presses, releases, mouse movements etc. Those are different types with nearly similar sizes. If I didn’t used heap, I should create memory pools for those. Another layer of burden..

Dynamic Data

Again in Awin library, the clipping regions are calculated on the fly. For those haven’t cared what clipping region is: Suppose the following, a button inside window:

ClippingRegion-Bare

Window manager has two options to draw whole window: First draws Window area, which erases Button area, than draws Button area. This causes two problems: Unnecessary drawing the area under the Button, and unnecessary flicker. If you don’t count it as an effect though.

The window manager splits the area into areas that don’t have intersections as following:

ClippingRegion-Split

Than calls draw methods of each class with given regions.. Because the draw methods do not erase what other methods have done, this method save CPU time (read it as speed, less power, longer battery time) and flicker at a certain leve as well.

Suppose the application made another objects, let say, a label visible. Now the clipping region map would be different..

To support dynamic (did I say dynamic) mapping of clipping regions, I would have created another memory pool for clipping subsystem. Which is managing another memory.

Zero Configuration

For years, when I had to use the code other people created for embedded systems, such as Bluetooth LE, FAT, protocol handling libraries, I had to deal with ugly macros to start up. To turn on this feature write this macro, to set buffer size, define this macro, to define how many tasks your application would use set this macro.

Because it creates a lot of errors, Keil made a configuration page for its macros:

KeilConfigurationWizard

I cannot blame that is bad. In the past I used it to configure my builds to turn on and off features. However, it is just a neat way to define macros that’s it..

What if the system configures it self and gives the developer a better interface. For instance to set a serial ports transmit fifo, wouldn’t be more readable if we write:

serialPort.setTxFifoSize(1024);

Or to create a new thread:

Thread thread;
thread.start(myThreadFunction);

It creates a thread with default size of stack. You may set the stack size as well:

Thread thread;
thread.setStackSize(512);
thread.start(myThreadFunction);

I know, those last two samples are static allocations that uses dynamic allocation. But neat! Isn’t it?